In the previous sections, we explored the exciting world of entrepreneurship and how it can be a fulfilling path for seniors in retirement. We explored the concept of small-scale businesses, discussed the various types of ventures that can emerge from DIY hobbies, and highlighted the unique skills and experiences that seniors bring to the table. We also emphasised the importance of sustainability and how it can be integrated into your business model.
Now, it’s time to put all this knowledge into practice and start developing your own business idea. This section will guide you through a series of short but efficient practical exercises designed to help you clarify your idea, identify your target market, and create a roadmap for success (your business canvas). We’ll be using a customised Business Model Canvas (BMC) template specifically tailored to the topic of our module. This template will help you visualise and organise your business idea in a clear and concise way.
How to develop and refine your business idea?
Let’s follow the standard but proven approach of defining and redefining your business idea in 3 simple steps – brainstorming, defining your niche, and conducting a brief market research.
Brainstorming your skills and what you like. Here is how:
Start by listing all your hobbies and skills. Don’t limit yourself – include everything you enjoy and are good at, even if it doesn’t seem like an obvious business idea at first.
Consider your past experiences, both professional and personal. What skills have you acquired throughout your life? What knowledge do you possess that could be valuable to others?
Think about the problems you’ve solved or the challenges you’ve overcome. Could your solutions or expertise be turned into a product or service?
Consider sustainability, how your business idea can be sustainable?
Once you have a list of potential business ideas, it’s time to narrow it down. Consider the following questions:
Which hobbies or skills are you most passionate about?
Which ones have the potential to generate income?
Is there a demand for your product or service in your community or online?
Who would be your potential customers?
Then it becomes trickier! You need to conduct a basic market research.
This is essential for understanding your target audience and potential competitors. It helps you validate your business idea and make informed decisions about your product or service, pricing, and marketing approach.
Start by researching your potential customers. Consider the following:
Identify your potential customers: Who are they? What are their demographics, interests, and behaviors?
Understand their needs and preferences: What problems do they have that your product or service can solve? What features or benefits are they looking for?
Determine their willingness to pay: How much value do they place on your offering? What price point would be attractive to them?
Locate your target market: Where do your potential customers live, work, or spend their time?
Next, research your competitors.
Who else is offering similar products or services? What are their strengths and weaknesses? What is it that makes you different from these competitors? You can conduct market research through an online search, a survey, interviews, or by simply observing your target market.
Next, you should refine your business idea further!
How? Use the Business model canvas that we have explored in the previous sections. Remember, BMC is a visual tool that will help you map out the key components of your business and ensure they align with your overall vision. Let’s have a quick exercise! Follow the steps below:
Download the template: Download the customised BMC template provided here: (LINK)
Fill Out the blocks starting from the centre, i.e. defining your Value Proposition: What unique value do you offer to your customers? What problems do you solve, or what desires do you fulfil? This is your starting point. Then, you move to the blocks on the right of the canvas, i.e. the customer segments, channels, and customer relationships. They link the value proposition with the key activities and resources. Connect the resources with the costs needed to obtain them. What are the main costs incurred in running your business? Once you have the costs, think of the revenues or how your businesses can generate income/profit! Work through each block of the BMC, using the instructions and examples provided in the previous section as a guide. Be as specific and detailed as possible.
Review the completed the BMC carefully and refine your answers as needed. Don’t be afraid to go back and forth between the blocks as you gain new insights.
Ask for feedback by sharing your BMC with friends, family, or mentors for ideas and suggestions.
By completing this exercise, you will have a solid foundation for launching and growing your sustainable DIY business. Remember, the BMC is a living document that should be updated and revised as your business evolves.
Also, check this simple-to-understand video explanation on how to fill in your business canvas.
Now that you have learned all there is to know about engaging with other users on different social media platforms via likes, shares and comments, and even gotten some inspiration from fellow DIY-ers, it’s time to put your knowledge into practice in your own channels! Follow the practice activitiesbelow to put your skills to the test:
Activity 1: Share a personal DIY project on social media
Select a DIY project:
Choose a recent or current DIY project that you are proud of or excited about.
Ensure the project is complete or in a presentable state for sharing.
Capture High-Quality photos or videos:
Using the tips previously provided throughout the different Units of this Course, make sure your photos or videos are of the highest quality possible. Remember to take certain factors into account, such as the ones below:
Lighting: Use natural light if possible. Otherwise, arrange lamps to reduce shadows.
Composition: Ensure the project is the main focus. Clean the background to avoid distractions.
Angles: Take multiple pictures from different angles to showcase different aspects of the project.
Write an engaging description:
Describe your project and how you managed to create it. You can use the following structure for inspiration:
Introduction: Briefly introduce the project and what inspired you to create it.
Process: Describe the steps you took, materials used, and any challenges faced.
Outcome: Share your feelings about the finished project and any future plans related to it.
Use hashtags:
Include some of the relevant hashtags we previously mentioned in this Unit!
Use 3 to 5 hashtags to reach a broader audience.
Publish the post:
Share your post on your preferred social media platform
Encourage your network to like, comment, and share.
Activity 2: Join DIY Facebook groups and engage!
Search for relevant groups:
Use the keywords and phrases we previously talked about in this Unit to browse and discover the groups that interest you the most.
You can also try some of the previously mentioned Facebook groups from the “Discover more” section of this Unit.
Review the group descriptions and rules before joining to ensure they align with your interests.
Request to join groups:
Click on the “Join” button and answer any membership questions, if required.
Wait for the administrator to approve your request, if that is the case.
Browse group posts:
Once you’re a member, browse through recent posts to get a sense of the community and types of projects shared!
Look for posts that resonate with your interests or that you find inspiring.
Engage with Posts:
Like and react to posts you find interesting or inspiring.
Leave positive and encouraging comments on posts that you appreciate.
Activity 3: Engage with DIY enthusiasts via comments and hashtags
Explore DIY hashtags:
Search for some of the hashtags we previously provided in the “Explore” section of this Unit!
Browse through the posts under these hashtags to find projects that catch your eye.
Comment on Posts:
Leave thoughtful comments on projects you admire. Compliment the creator and ask questions if you’re curious about their process.
Share your own experiences if you’ve done a similar project, fostering a sense of community with others.
Follow Creators:
Follow some of the DIY enthusiasts we have shared in the “Discover more” section of this Unit whose work you appreciate to keep up with their future projects and stay inspired.
Engage with their posts regularly to build connections and potentially gain followers for your own projects!
Activity 4: Use hashtags to find inspiration across different platforms
Select a few key hashtags:
From the list of hashtags provided in the “Discover more” section of this Unit, select a few of them to start your search.
Note these hashtags for use on different social media platforms.
Search hashtags on various platforms:
Search for the selected hashtags on Facebook, Instagram and TikTok.
Observe the different types of content that appear on each platform.
Browse and save ideas:
Scroll through the posts and save any ideas or projects that inspire you!
Create a folder to keep all your saved ideas organised.
Share your findings:
Post about your favourite findings on your own social media, using the hashtags you explored.
Encourage your network to check out these inspirations and share their thoughts.
Let’s continue our discovery of the various DIY videography tools by learning everything you need to know about filming yourself during your DIY sessions, the steps to follow when preparing a video, and setting up your videography tools to ensure the quality of your video.
Setting up your tools
As we already saw in the previous sections, we have learned about the tools and the main stages of preparation for filming:
Your smartphone, with its video mode
A tripod (or makeshift tripod)/handheld to ensure a stable, fixed image
A script for each step you have written in the previous sections
We’ll now be able to discover and prepare for the filming process itself, thinking about how to spin our sustainable practice in its natural setting.
Get ready to film in the shooting environment
Before you start filming, first go through the following checklist:
Make sure your phone has enough memory to save the videos you’re going to make (you can check this in the ‘Storage’ section of your smartphone’s Settings).
Put your phone in flight mode (in the Settings) to avoid any interruptions to your filming by ringing or vibrations from your phone.
Pay attention to the time of day at which you are going to film your DIY practice: natural light makes for much better-looking videos. Direct light sources such as lamps should be used with care after a preliminary video test, and it’s important to ensure that they don’t create too many shadows or strong contrasts.
If you are shooting indoors, try to position the subject close to a window, lamp or other light source, but not in front of them, so as to avoid backlighting. This will ensure that the subject is well lit, while guaranteeing the quality of the video.
If you are filming outdoors, pay particular attention to the overall environment: pay close attention to the light, which changes rapidly, and to outside noise from sources you cannot control (people on location, weather elements, work in the street, etc.). When filming someone or a specific element of the setting, pay close attention to the background: find a location with an interesting background but not too distracting.
Consider any noise the microphone may pick up on your phone. Close doors or windows if necessary, and minimise any unnecessary background noise.
Speak loudly and clearly and face the camera when discussing your DIY practice; this will help the microphone pick up your voice well.
To check all these points, and before you start filming your DIY practice, you can do a little test: put yourself in the frame, say a sentence or two the way you intend to speak, and mime some gestures. Then check your test. It may reveal problems with sound, framing, or anything else you can quickly correct.
How to shoot your action
Shooting in portrait mode is the best approach for this type of video, as it is the most useful format for spreading a message on social networks.
The easiest way to film this video is to use the stop-start filming method on your phone. This method allows you to pause the recording temporarily and then resume it a few moments or minutes later. This means you can include all the stages of your sustainable DIY project in a single video, even if what you’re creating requires you to wait several minutes to complete it.
Most smartphones should allow you to use the stop-and-start filming method. You need to start filming your video, pause recording when necessary, and then resume recording.
If your smartphone doesn’t allow you to use the stop-and-start method, you can film several short sections, and we’ll see how to put them together later in this module.
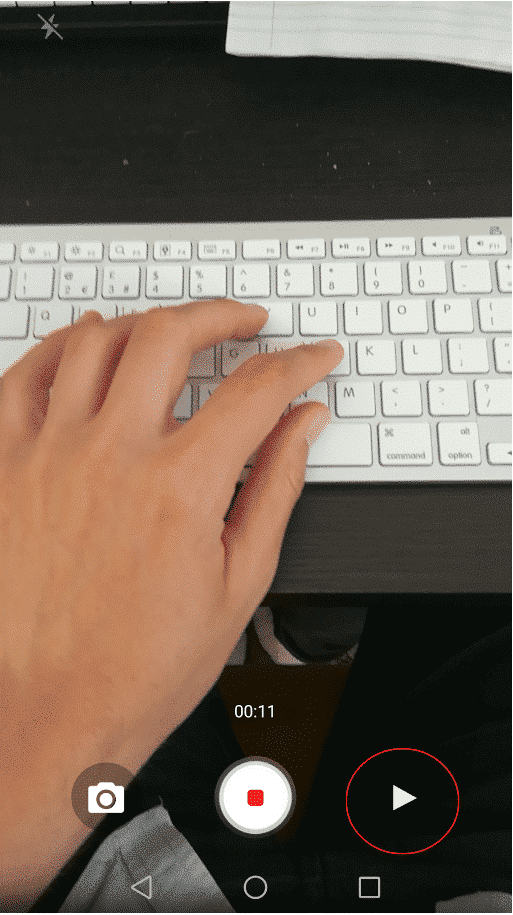
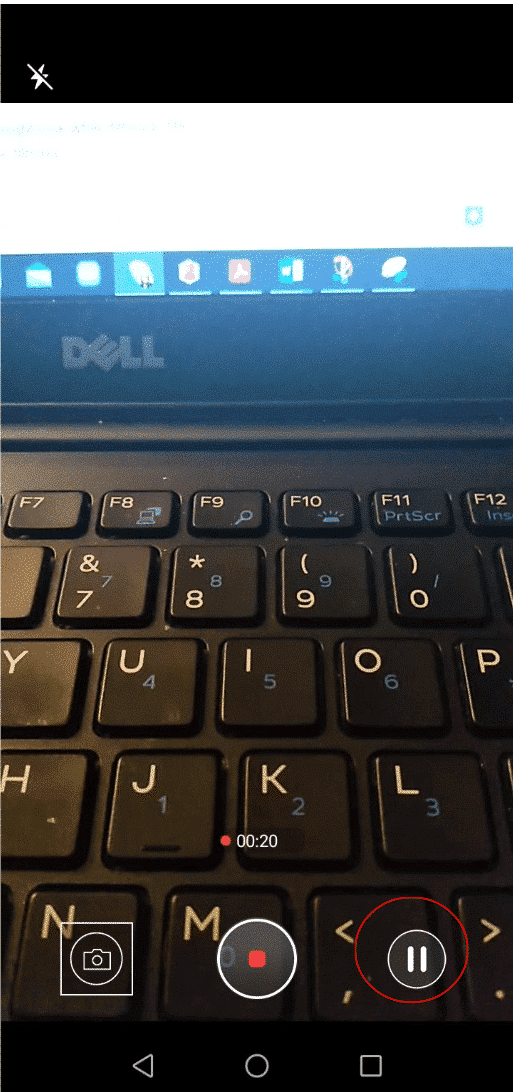
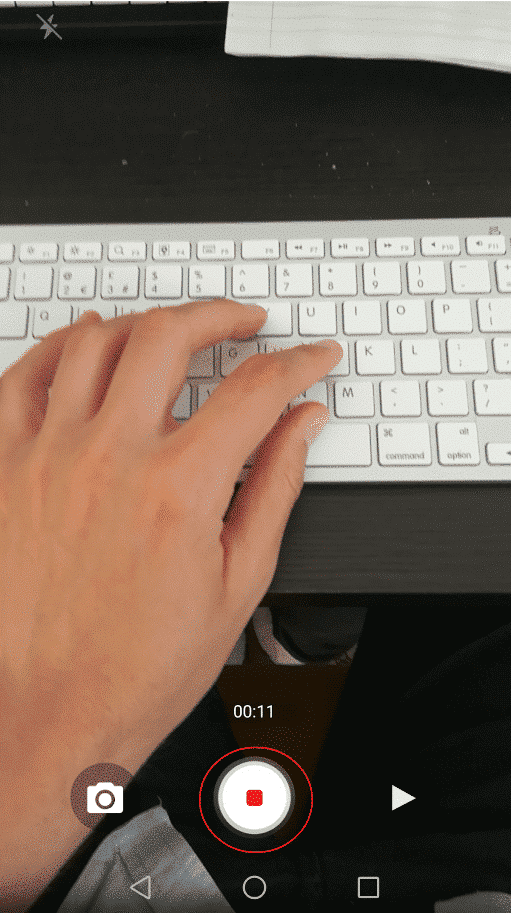
Stop-start filming method on Android:
Start your video by pressing the Play button on the right (image 1).
To pause recording, press the Pause button on the right, which will replace the Play button once the video has started (image 2). Then, resume your video using the same Play button.
To end your video, click the Stop button in the centre (image 3).
Filming Method on Android
Filming Method on Android
Filming Method on Android
The stop-start function is only available on Android and not on iPhone. For iPhones, you can practise filming everything in a single take, or film small separate takes that you can paste together into a single video in editing software (see the Practice section).
Practical tips and tricks
Here are a few more tips to finish preparing you to film your sustainable DIY practice. These should become increasingly easy for you over time.
First of all, remember to pay attention to the way you hold your phone if you’re filming without a stand or tripod. This will help you avoid over-straining your arms and wrists, covering the camera with your finger, or distorting the image when you take the shot. To avoid this, pay close attention to your positioning during short test videos, find the ideal position for you, and note the location of the camera on your phone before you start filming so that you don’t place your finger too close to it.
When filming or preparing a shot, always try to centre the camera’s focus on the main action. Whether it’s a close-up of what you’re doing or a wider shot where you’re presenting your creative environment, centering the action will always make your video more symmetrical and better composed.
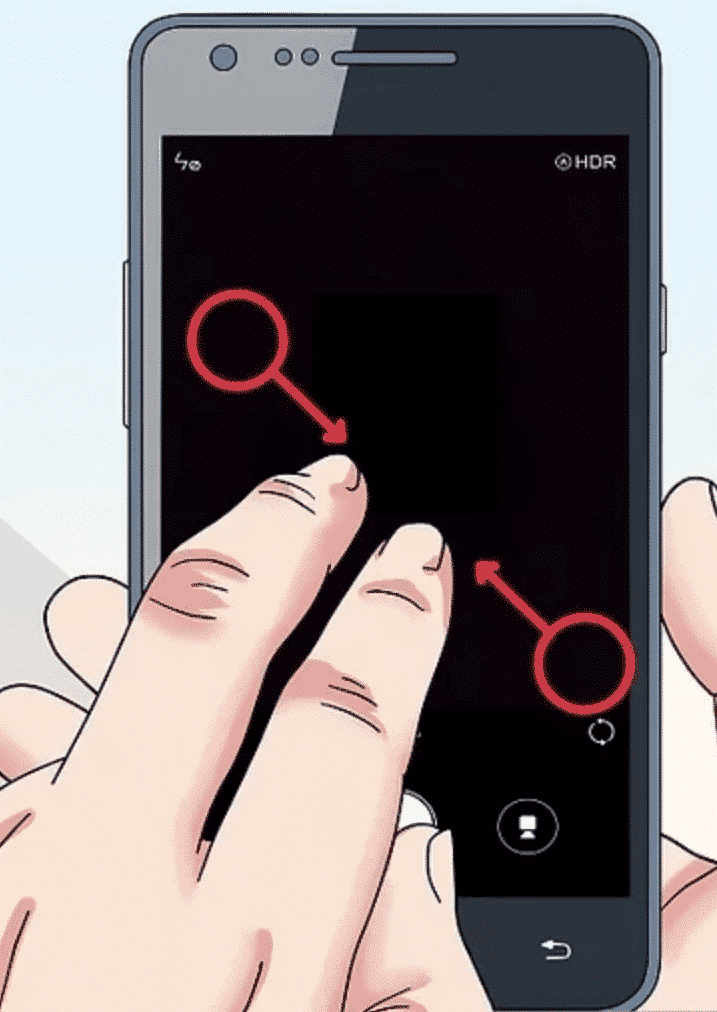
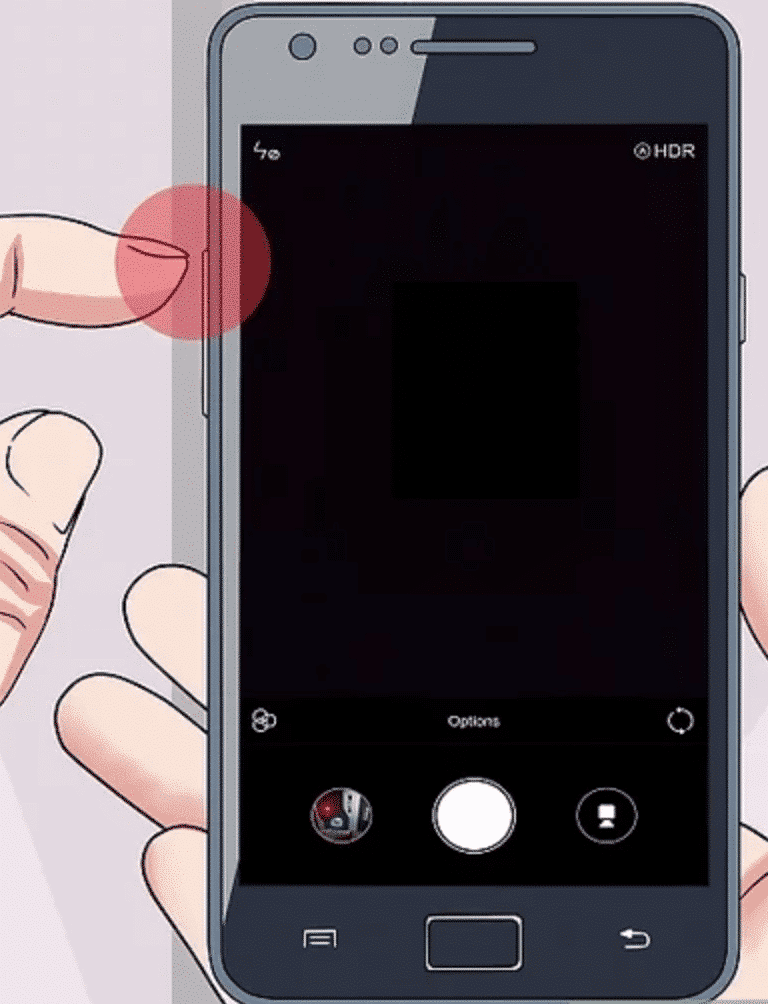
How to use the zoom on Android:
You can zoom in and out on Android:
Pinch with two fingers, either together to zoom in, or apart to zoom out (image 1)
By clicking on the volume buttons on your Android (image 2): the button for raising the volume zooms the camera in, the button for lowering the volume zooms the camera out. Warning: this method does not work on all Android devices.
Zoom on Android
Zoom on Android
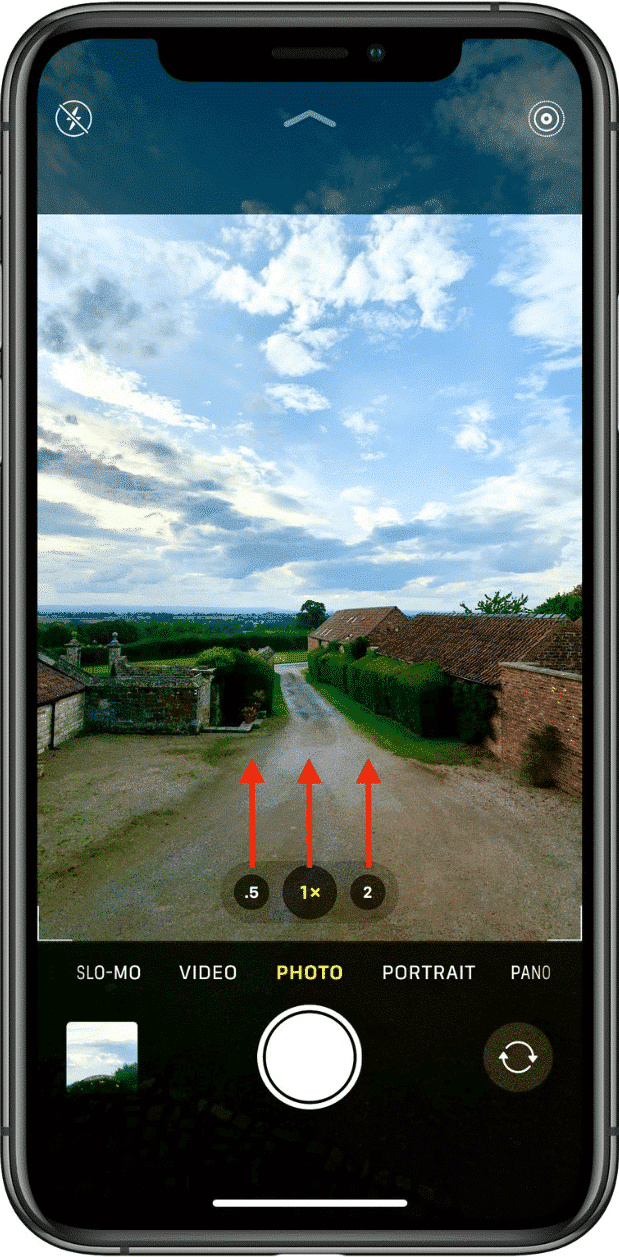
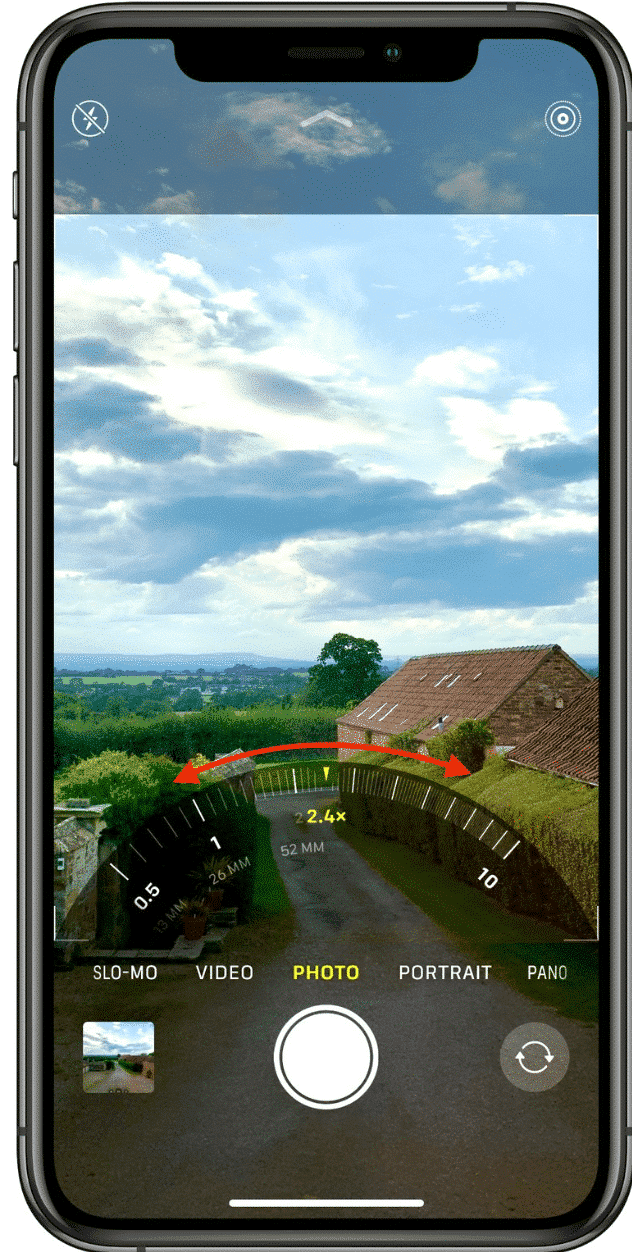
How to use the zoom on iPhone:
There are several ways to zoom in on your iPhone:
Pinch with two fingers on the screen, bringing them together to zoom in or moving them apart to zoom out.
Click on the preset zoom settings at the bottom of the screen (see the left-hand photo below) to use them.
For finer zooming in and out, keep your finger pressed down on the preset zoom settings, and you’ll see a thumbwheel appear (see right-hand photo below). Turn it in either direction to choose your zoom setting.
Zoom on iPhone
Zoom on iPhone
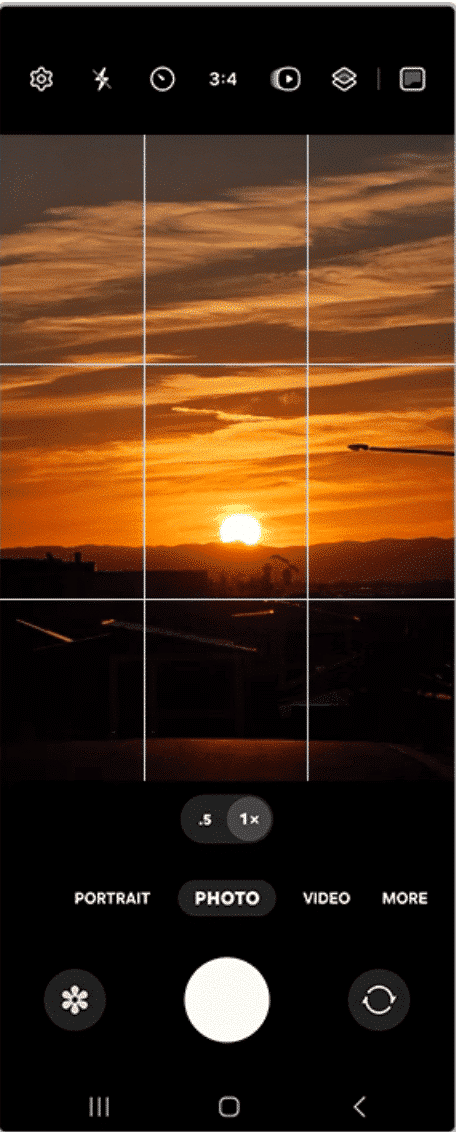
On most smartphones, you can display a 3 by 3 grid on the screen of your photos and videos. You can use this to centre your shots, as you can try to ensure that the focal point of what you are filming is placed in the central part of the screen.
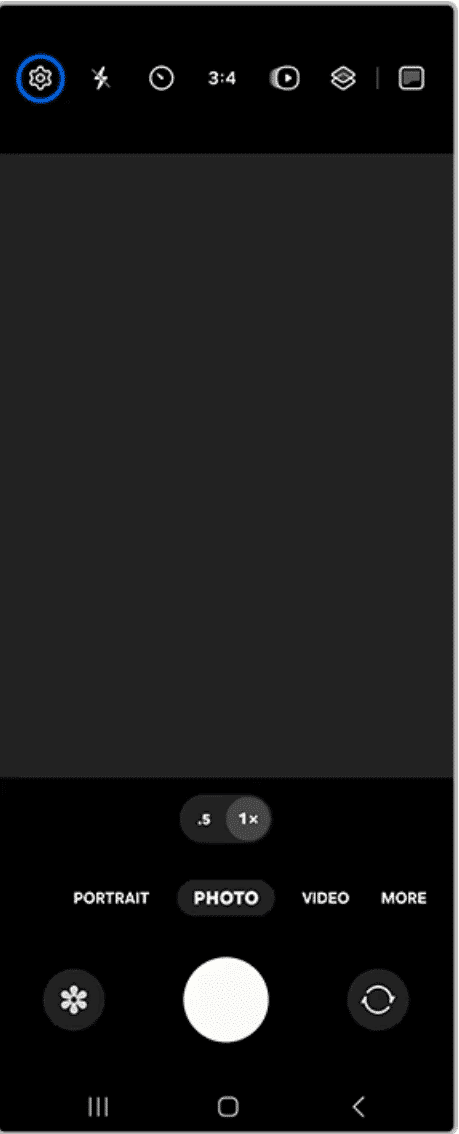
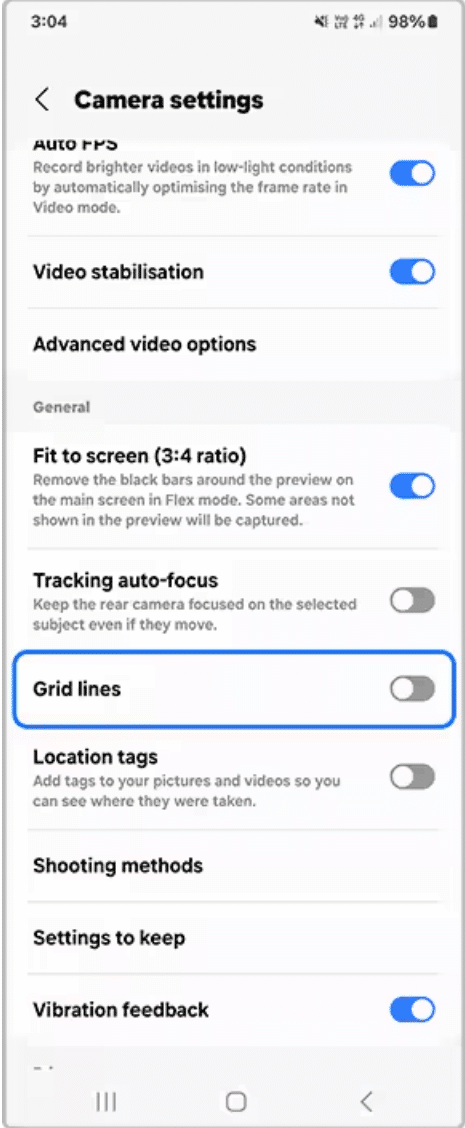
How to enable the grid on Android:
Launch the Camera app icon Camera app
Tap on Settings icon Settings
Toggle on Grid lines
Grid on Android
Grid on Android
Grid on Android
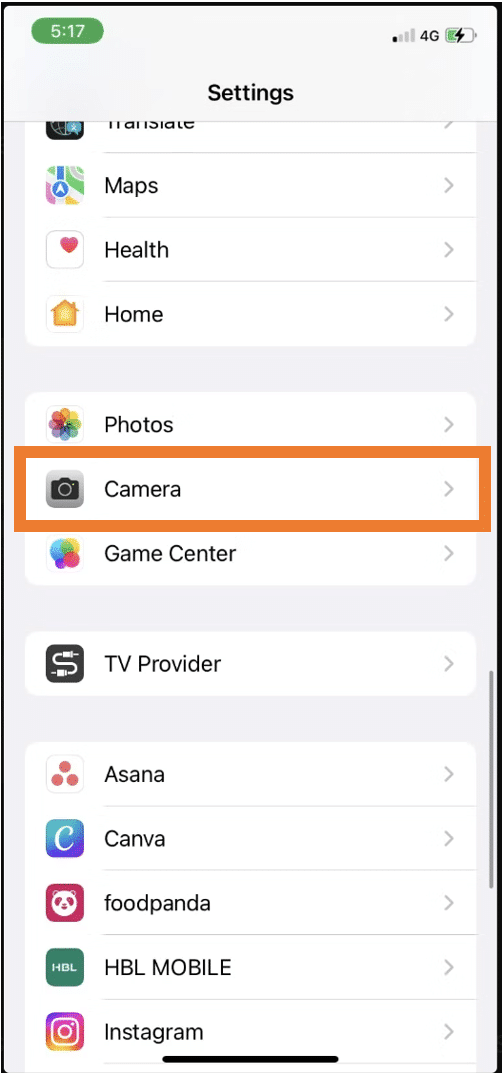
How to enable the grid on iPhone:
Open the Settings application and go to the Camera section.
Under Composition, activate the Grid checkbox.
Open the Camera application to check whether you can see the grid lines on your screen.
Grid on iPhone
Grid on iPhone
Grid on iPhone
Finally, with a bit of practice, try combining different types of shots: close-ups, wide shots, panoramic views, zooming in on an action with a narrative voice in the background… You can also study the resources in the “Discover more” section to keep practising and trying out new ways of filming. All this contributes to making a unique video, combining images with an interesting narrative, and mixing freely to create something unique that reflects your vision of a sustainable environment.
Editing
Once you’ve made your film, you can also edit it. To do this, we’re going to present you with several solutions below, as well as links to learn more and go further.
First, let’s review what the native video editors on smartphones can offer you, for some simple video editing. The tools on offer are fairly similar on each type of smartphone, with no one standing out more than another.
Trimming: You can cut off either a part of the beginning or the end of a video file to reduce its total length and keep only the desired content.
Basic colour and light adjustments (exposition, luminosity, contrast, saturation, temperature, filters): If you want to change the style of your video, or correct any defects in luminosity during filming, the native editor offers a number of filter and contrast change options.
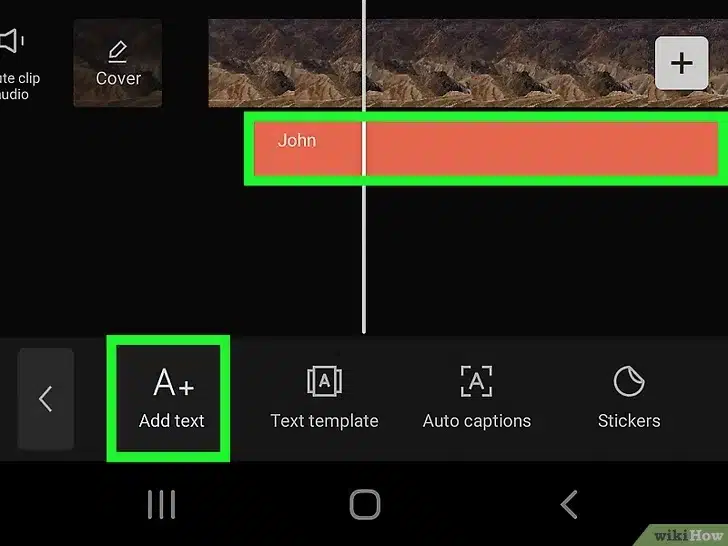
Adding text and subtitles: You can add short texts to your videos, choosing their font, colour,position,n and duration in the video, and even add some text animations.
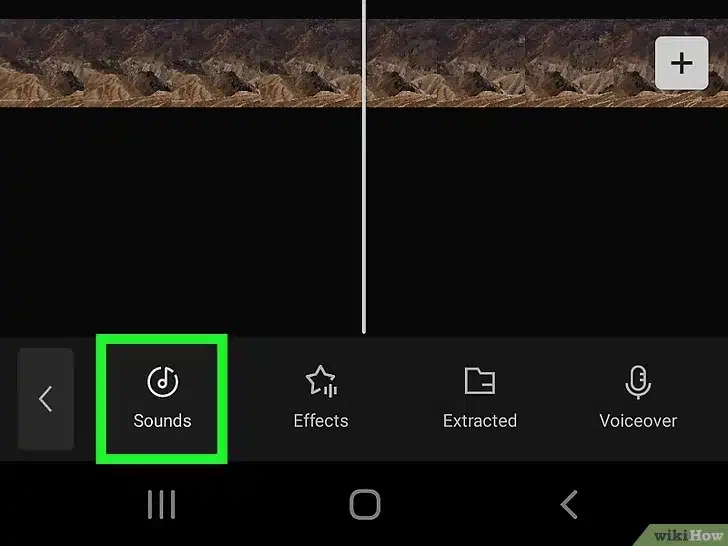
Adding music: To make a silent video more attractive or liven it up, you can add music and special sound effects, choosing when to add them in the video and for how long.
Cropping: To refocus viewers’ attention on a particular part of your video, remove unwanted external areas, or change its dimensions (aspect ratio) to adapt it to different social networks, you can use the crop tool, which lets you choose the part of your video that will be visible to your viewers.
More additional features are provided by external apps (for example: InShot, CapCut, Filmora etc.).
Adding more videos and possibility to adjust each video separately: While this feature is available in the native video editor on Android, it is not available on iPhone. It allows you to paste several videos one after the other, and rework them separately, to create a single, larger video of a quality you’re happy with.
Changing the order between videos: Changing the order of the short video extracts that make up your main video can be useful if you have forgotten any explanations in the presentation of your DIY, or will help to make your editing dynamic by interspersing explanatory moments with shots presenting your DIY.
Transitions between videos: To liven up your video and make sure it captures your audience’s attention, you can add transitions between each of your short videos to create a larger one, adding visual, text and sound effects.
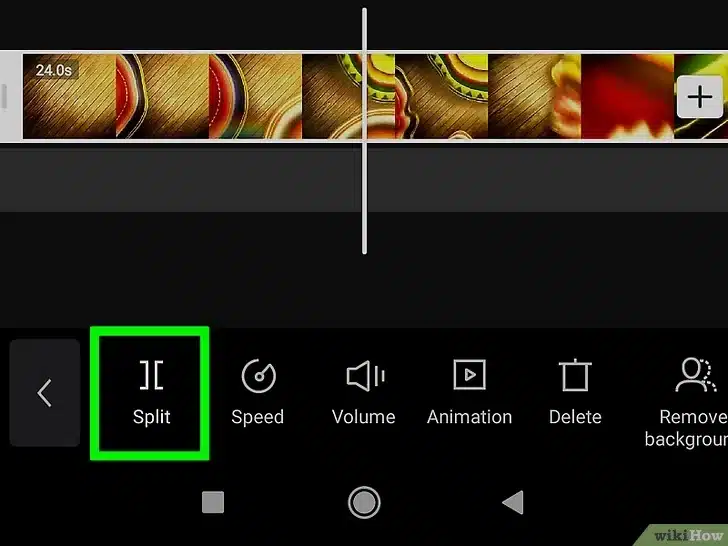
Divide a video into multiple parts: Splitting the video of your DIY activity into several videos can serve several purposes, such as removing less interesting passages from your video, or creating several short pieces of content to present in several instalments on social networks.
A step by step guide for simples editing:
Choose the video(s) you want to include
Choose video
2. Adjust the order of the videos (by touching them continuously and dragging them left or right)
3. Adjust the duration of the videos: Trim (by dragging from their side to the center) or Split them
Adjust duration
4. Add Titles/Text
Add titles/text
5. Add Music
Add music
The screenshots used come from an online source, explaining the use of CapCut, included in the next section. More detailed screenshots/explanations about each step in each of the suggested applications can be found in the following resources!
After carefully reading Unit 2 and watching the videos suggested above, you can now start creating your own profile on social media. Take it step-by-step and take your time. It is always better to have someone more experienced to guide you through.
Checklist for your first steps:
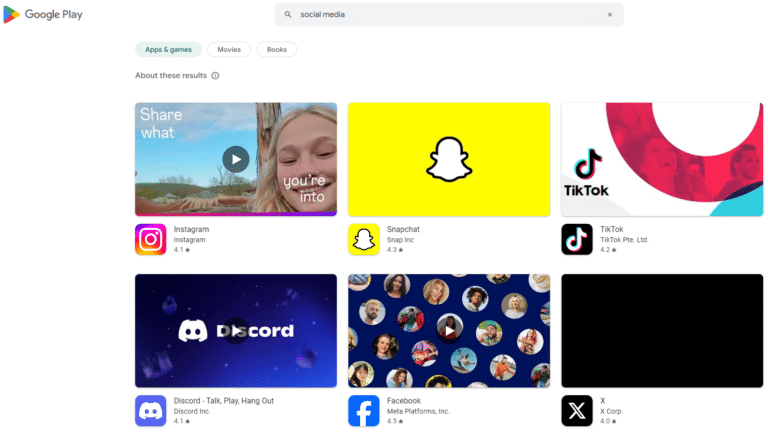
Select which social media app you prefer.
Selection of social media
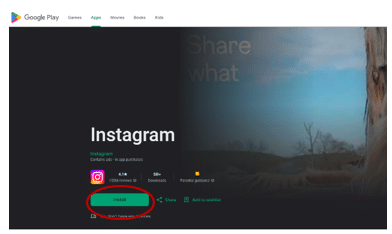
Download the app on your mobile device, laptop or PC.
Download the app
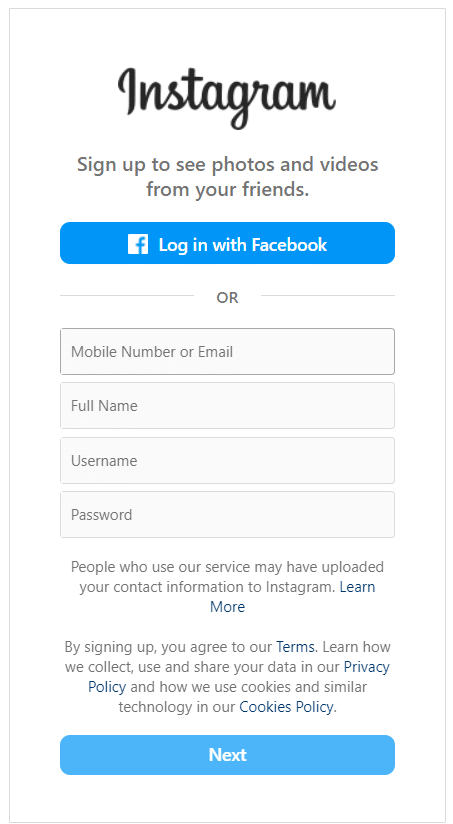
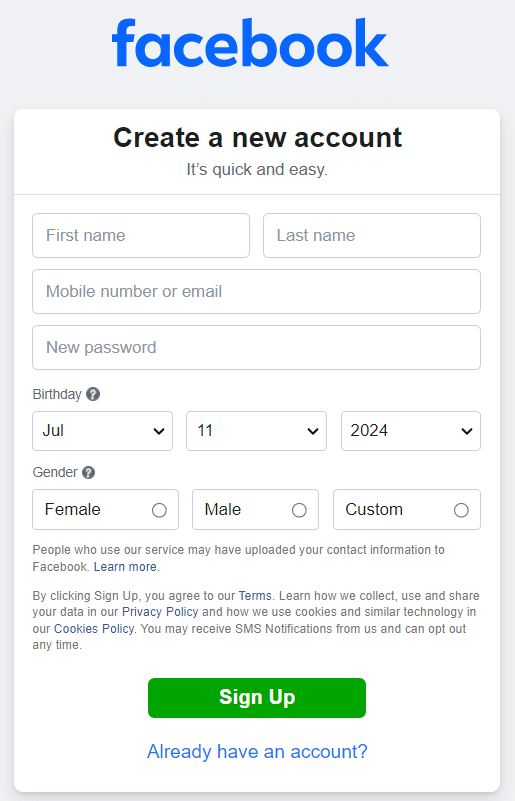
Sign up and create your account with some basic information and a picture of you.
Creation on Instagram
Creation on Facebook
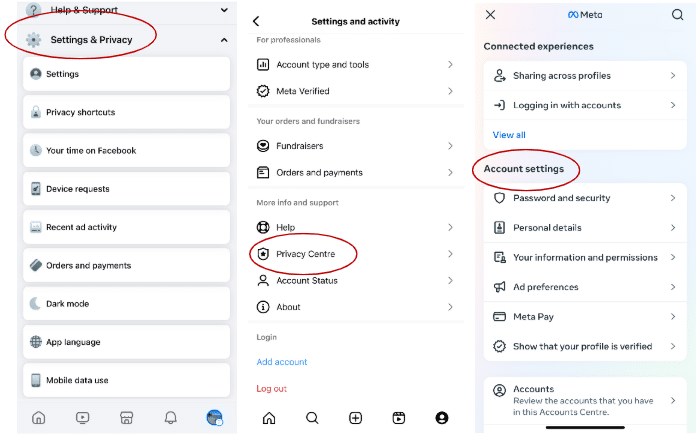
Explore and adjust the privacy settings to your preferences.
Privacy Settings
Connect with your family and friends.
Start posting, and always keep in mind to be careful with the information you share. Check below the guide for your first post!
Guide for your first post:
Decide what type of content you want to share. This could be:
a written post
a picture
a photo album
a video
a combination of text and photo/video.
Log in to your account by entering your username and password.
Click the post button, usually labelled as “Create Post,” “New Post,” or with a plus icon (+).
Choose the photo/video you want to upload and write a text to accompany it if you like.
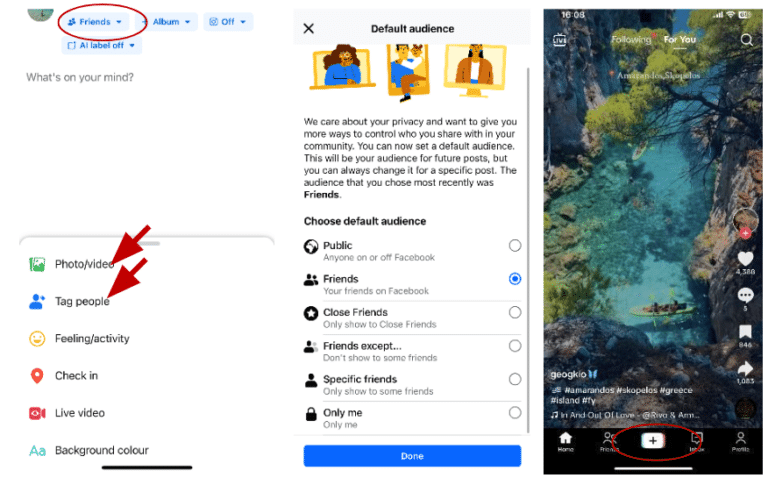
Before posting, you can always adjust your settings and the audience that has access to your posts. You can also tag other people in your post if they are relevant to the content.
First Post
Review and double-check the content of the post for any errors.
Once you are ready, click the “Post,” “Share,” or “Publish” button. Your content is now live and visible to your selected audience!
As we conclude this unit on DIYs and their role in promoting sustainability, it’s time to put our knowledge into action. We’ve explored the transformative potential of do-it-yourself projects in fostering sustainability and empowering seniors to make a meaningful impact on our planet. Now, it’s your turn to take the reins and apply the key takeaways from this unit to your own life.
Think about the personal examples—the community gardens, repair cafes, upcycling initiatives, and more. These are tangible manifestations of how DIYs can contribute to a greener, more sustainable world while also enriching the lives of seniors. By embracing the DIY mindset, we have the power to not only reduce our environmental footprint but also build stronger communities and enhance well-being.
So, each of you take a leap of faith and embark on your DIY journey to address climate change. Whether starting a small garden, repairing broken household items, or upcycling old materials into something new, every action counts. By applying your newfound knowledge and skills, you’ll make a positive impact on the planet and inspire others to join the movement towards a more sustainable future.
Checklist
Starting a DIY project can be exciting and rewarding, but planning carefully is important to ensure success. Here’s a detailed checklist to help you get started:
Define Your Project: Clearly define what you want to accomplish with your DIY project. Whether it’s building furniture, repairing electronics, or crafting home decor, having a clear vision will guide your efforts.
Research and Gather Information: Take the time to research different techniques, materials, and tools needed for your project. Gather information from reliable sources such as DIY websites, tutorials, books, and videos.
Assess Your Skills and Resources: Be honest about your skills and abilities. Determine if you have the necessary knowledge and experience to complete the project or need to learn new skills. Assess your available resources, including time, budget, and space.
Create a Budget: Estimate the cost of materials, tools, and any other expenses associated with your project. Create a budget to ensure you stay within your financial means.
Gather Materials and Tools: List all the materials and tools you’ll need for your project. Purchase or gather everything in advance to avoid interruptions during the construction process.
Prepare Your Workspace: Set up a designated workspace that is clean, well-lit, and ventilated. Ensure you have enough space to work comfortably and safely. Consider using protective equipment such as gloves, goggles, and masks when working with certain materials.
Plan Your Timeline: Create a realistic timeline for your project, taking into account your schedule and any potential setbacks. Break down the project into smaller tasks and set deadlines for each stage to stay organised and on track.
Follow Instructions and Safety Guidelines: Read and understand all instructions, manuals, and safety guidelines related to your project. To prevent accidents and injuries, follow proper safety protocols when handling tools, materials, and equipment.
Take Measurements and Test Fit: Measure twice, cut once! Take accurate measurements and test fit components before making permanent modifications. This will help ensure precision and avoid costly mistakes.
Stay Flexible and Problem-Solve: Be prepared to encounter challenges and setbacks. Stay flexible, patient, and adaptable, and don’t be afraid to problem-solve creatively if things don’t go as planned.
Document Your Progress: Track your progress by taking photos, making notes, or creating a project journal. This will not only help you stay organized but also serve as a record of your achievements.
Celebrate Your Success: Once your DIY project is complete, take a moment to celebrate your success and admire your handiwork. Reflect on what you’ve learned and consider how you can apply your newfound skills to future projects.
By following this detailed checklist, you’ll be well-prepared to embark on your DIY journey confidently and enthusiastically!
To advance between units, you must read the current and previous unit.
Cookie Settings
The Senior4Change Platform may use cookies to remember your login data, collect statistics to optimize the website’s functionality and to carry out marketing actions based on your interests. You can customize the cookies used in
.